VR Panoramas > Director/Shockwave
The Flash Compass Revisited
As is the case with LiveStage, Quicktime parameters can be passed to Flash; you can set values in Flash and send them, via Director, to the Quicktime track; and you can make events in Quicktime trigger actions in the Flash track.
This tutorial describes how the above movie was created.
- Step 1: Scripting the Flash movie.
Again, as this is not a Flash tutorial, we won’t go into too much detail here – more information can be found in the Flash section. This is actually using the very same methods and actionscript as was used in the LiveStage tutorial (that’s how flexible it can be to use Flash interactive elements! Unfortunately changes are necessary to the layout of the file - note that the compass is not actually "over" the movie this time. A limitation of Director, it cannot overlay items over a video, as they use a setting called Direct-to-Stage. In essence this means that the video will always be on top!), although using Flash with Director opens up the possibility of using 'onClipEvent(enterFrame)’ as it is supported here – as well as a whole host of other benefits.
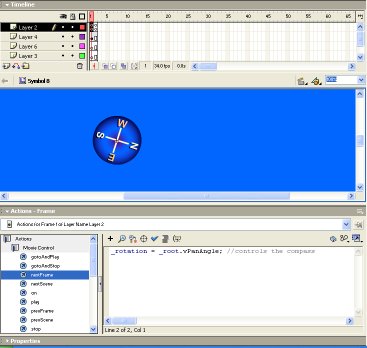
This Flash file again features our ‘revolver’ movie clip - a two-frame loop in which both frames contain the following actionscript):
_root.compass = _root.vPanAngle
This script sets the rotation property of the compass movie clip with the variable called 'vPanAngle'.
- Step 2: Importing Quicktime into Director
NB: This method applies to Director 7 and above. Note that, if you are running this tutorial on a PC - the QTVR movie you use must have been "flattened". This means that the QTVR movie has had its data and resource ‘forks’ combined. This step is essential if the QuickTime movie is to be used on the Internet or on a PC. QuickTime movies produced on the Macintosh are not always ‘flattened’ – this can be done via Quicktime Player Pro.
- Select Insert > Media Element > QuickTime…
- Click on the Cast Member Properties icon in the QuickTime cast member window
- Click on the Options... button in the Xtra Cast Member Properties dialog box
- Click on the Browse... button and select your QTVR movie.
- After a few moments a preview of your QTVR movie should appear in the left hand box. Click OK and then OK again in the Xtra Cast Member Properties dialog box. Finally drag the QTVR cast member onto the score.
- Step 3: The Lingo
We now need to get Director to set a value in Flash based on the pan angle produced by the QTVR movie. Lingo can easily communicate between the Flash Track and QTVR.
Here is the script:
property vpan -- this declares the variable "vpan" - we will use this to represent the vpan of the QTVR
on enterframe -- the enter frame event. This means the following code will be executed EVERY frame of the movie.
vpan = sprite(3).pan -- in this case sprite(3) is the QTVR track/sprite. pan is the pan angle value returned by the QTVR movie
setVariable(sprite 1, "vPanAngle", string(vpan)) -- this is how Director communicates with the Flash track sprite 1. Basically, it tells Flash to set the variable vPanAngle to the same value as vpan returned above.
end -- ends the on enterframe event
So essentially this sets the ‘vrpan’ variable in the Flash track to be same as the current pan angle of the QTVR track. Easy as that!
- Step 4: Export the Movie
To do this, select File > Publish